最近的短视频自动生成项目用到了FFmpeg进行视频的合成,因此这里记录下相关的一些笔记,供今后参考。
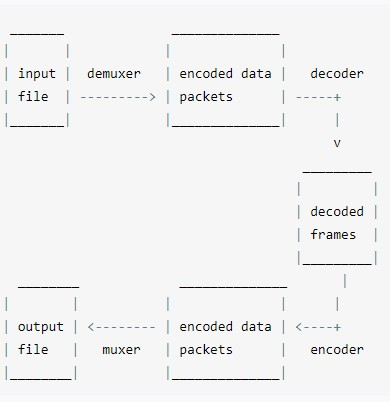
处理流程
名词概念 怎么发音 ef ef em peg
容器 编码格式(CODEC)
注意容器和编码是两个概念,要区分一下。
编码器(encoders) 输入&输出 可以理解为加工厂的概念。
流与分层的概念 以电影的视频文件为例,里面的每个音频、视频,都是一个流:
1
2
3
4
5
6
7
8
9
10
11
12
13
14
15
16
17
18
19
20
21
22
23
24
25
26
27
28
29
30
31
32
33
34
35
36
37
38
39
40
41
42
43
44
45
46
47
48
49
ffprobe movie.mp4
如何选择流 可以通过-map选择需要合并的流。
如果不设置-map参数,则ffmpeg会采用默认的机制进行流的选择。
分离视频和音频 https://blog.csdn.net/gent__chen/article/details/61197443
1 ffmpeg -i test.mp4 音频流.mp3
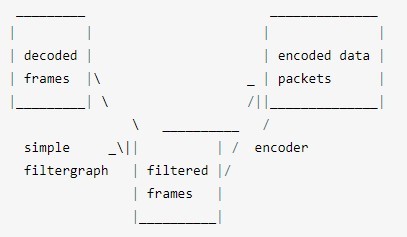
滤镜 简单滤镜
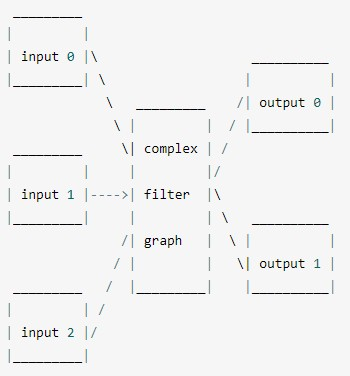
复杂滤镜
比特率(Bit Rate) 在视频领域,比特率也常翻译为码率 (transrating),从这个英文单词就可以看出来,这是决定转换速率的一个指标。
https://blog.csdn.net/rootusers/article/details/41646557
https://www.cnblogs.com/liusx0303/p/7572050.html
码率(位/秒)= 屏幕显示分辨率(无单位) * 彩色位数(位)* 帧率(帧数/秒等同于HZ)
比特率决定每个时间单位处理的bit数,对于视频质量有很大的影响。
我之前合并图片为视频的时候,是由ffmpeg自动识别比特率,结果因为识别到的比特率过低,导致合成的视频非常模糊;后来手动设置一个比较大的比特率后,合成的视频就清晰多了。
查看比特率 可以通过ffprobe查看视频比特率,比如下面的bitrate就是比特率:
1
2
3
4
5
6
7
8
9
10
11
ffprobe /var/www/micro-video-deploy/data/temp/screenshot-test/output/result.mp4
设置比特率 可以通过-b:v这个选项设置比特率:
1 ffmpeg -framerate 60 -i /var/www/micro-video-deploy/data/temp/screenshot-test/images/timecut-frames-1605756276992/image-%09d.jpeg -pix_fmt yuv420p -b:v 2043k -y /var/www/micro-video-deploy/data/temp/screenshot-test/output/result.mp4
比特率与视频大小的关系 1 2 3 4 5 6 7 8 9 10 11 12 视频流的大小的方程式是(除以8是由bits到bytes的转换):
(TODO)比特率的上限 针对不同的图片,比特率是有上限的,即使你在合并图片为视频的时候设置一个非常大的比特率,生成的视频最终只会达到上限比特率。
这个上限就是图像原始数据的画质。
这个上限怎么来的我还没弄清楚。
色彩:RGB vs. YUV https://blog.csdn.net/IOT_SHUN/article/details/79719142
知识点:为什么一个分量是8位 这里为什么一个分量是8位呢?
命令格式 1 ffmpeg {1} {2} -i {3} {4} {5}
全局参数
输入文件参数
输入文件
输出文件参数
输出文件
1 2 3 4 5 6 ffmpeg \
其中全局参数的位置可以位于第一个,也可以位于倒数第二个;如果不明文设置参数,ffmpeg会自动识别并给出默认参数。
常用参数 1 2 3 4 5 6 7 8 9 -c:指定编码器
安装 CentOS 安装yasm https://www.cnblogs.com/brady-wang/p/11770512.html
源码安装FFmpeg https://www.cnblogs.com/wintercloud/p/11162962.html
这里直接记录下Dockerfile:
1 2 3 4 5 6 7 8 9 10 11 12 13 14 15 16 17 18 19 20 21 22 23 24 25 26 27 28 29 30 31 32 33 34 35 36 37 # 注意: # 命令最后一行的末尾,不能加换行符\,否则会把下一个命令的RUN给连接上去 # 通过换行符\进行连接的命令之间,不能有空行 # 环境变量不要通过/etc/profile进行设置,改为用ENV # Install dependencies for FFmpeg:yasm # Install FFmpeg # Clear packages
FFmpeg三板斧
初始化输入设备(初始化解码器及其应用上下文)
初始化输出设备(初始化编码器及其应用上下文)
编写帧处理逻辑(对符合要求的帧数据做各种运算处理)
查询 ffprobe 查看文件信息:
1 2 3 4 5 6 7 8 9 10 11 12 13 14 ffprobe output-优化版.mp4
注意:ffprobe的输出,默认是标准错误输出,因此无法直接重定向到文件,需要明确指定将标准错误输出重定向为标准输出:
ffprobe xx.mp4 &> file.txt
如果想直接命令行过滤信息,则需要这样指定:
ffprobe xx.mp4 2>&1 |grep “xxxxx”
在shell脚本中,默认情况下,总是有三个文件处于打开状态,标准输入(键盘输入)、标准输出(输出到屏幕)、标准错误(也是输出到屏幕),它们分别对应的文件描述符 是0,1,2 。
> 默认为标准输出重定向,与 1> 相同 意思是把 标准错误输出 重定向到 标准输出.
&>file 意思是把标准输出 和 标准错误输出 都重定向到文件file中
/dev/null是一个文件,这个文件比较特殊,所有传给它的东西它都丢弃掉
查看视频帧数 1 ffprobe -v error -select_streams v:0 -show_entries stream=r_frame_rate,width,height,duration -of default=noprint_wrappers=1:nokey=1 input.mp4
将某个流分离出来 音频 查询音量 1 ffmpeg -i great.mp3 -filter_complex volumedetect -c:v copy -f null /dev/null
合成 将图片合成为视频 https://blog.csdn.net/wangshuainan/article/details/77914508
1 ffmpeg -threads 10 -y -r 60 -i /tmpdir/image-%09d.jpeg output1.mp4
顺序合并多个视频 1 2 3 4 5 ffmpeg -f concat -i videoList.txt -c copy -y output.mp4
分屏合并视频 参考:使用java调用ffmpeg命令将视频分屏并音视频同时播放(二分屏)
1 ffmpeg -i /file/test.mp4 -i /file/test.mp4 -filter_complex "[0:v]pad=iw*2:ih*1[a];[a][1:v]overlay=w" out.mp4
多视频合成后,从第二个开始无法播放的问题 我们遇到过一个问题:合成后的视频,在部分播放器下面,第一个视频之后的其他视频无法播放。
每个视频单独合并2次,都是可以的。
猜测:和视频格式有关系
解决方案:合成前先对视频做个格式化,保证格式统一。
header:
1 2 3 4 5 6 7 8 9 10 11 12 13 Input #0, mov,mp4,m4a,3gp,3g2,mj2, from 'header.mp4':
body:
1 2 3 4 5 6 7 8 9 10 Input #0, mov,mp4,m4a,3gp,3g2,mj2, from 'body.mp4':
从上面的视频信息来看,二者不一致的东西是很多的,包括encoder、分辨率、帧数等等。
我们逐个测试,最终发现是因为分辨率不一致导致的 ;统一分辨率后,就可以正常合成了。
附上一些命令:
修改分辨率 1 ffmpeg -i body.mp4 -vf scale=620:1104 body.size.mp4
注意将低分辨率调高是没有用的,因为视频会模糊。一般都是高调低。
另外修改分辨率并不会修改高宽,更加全面的详见这个:
https://blog.csdn.net/anji0540/article/details/102442672
修改帧数 1 ffmpeg -r 25 -i body.mp4 body.25.mp4
(精)合并多个视频后,总时长不对,且后面的视频,没有声音了
不从原理上弄清楚,靠蒙去解决问题,效率极低,且埋下的雷总有一天会爆发。
先阅读官方文档:https://trac.ffmpeg.org/wiki/Concatenate
这个问题由2个因素构成:
解决方案:
1、统一需要合并的视频的分辨率和帧数
1 2 ffmpeg -r 20 video_header.mp4 -y header.fps.mp4
2、修改合并命令,改为提取流之后进行合并
1 ffmpeg -i header.fps.size.mp4 -i output.mp4.addaudio.mp4 -filter_complex "[0:v:0][0:a:0][1:v:0][1:a:0]concat=n=2:v=1:a=1[outv][outa]" -map "[outv]" -map "[outa]" -y test.mp4
codec是什么? 编解码器
视频和音频都需要经过编码,才能保存成文件。不同的编码格式(CODEC),有不同的压缩率,会导致文件大小和清晰度的差异。
常用的视频编码格式如下。
两种模式demuxer和protocol 合成透明背景的视频 mov格式的视频是带有透明通道的,可以通过-vcodec qtrle合成,亲测有效:
1 ffmpeg.exe -i %03d.png -vcodec qtrle -y movie_with_alpha.mov
拼接音频 1 ffmpeg -i 1.mp3 -i 2.mp3 -filter_complex "[0:a][1:a]concat=n=2:v=0:a=1[out]" -map "[out]" 3.mp3
该命令使用 filter_complex 过滤器来将两个输入流连接在一起,其中 [0:a] 表示第一个输入文件的音频流,[1:a] 表示第二个输入文件的音频流。concat 过滤器用于将两个流连接起来,n 参数设置为 2 表示两个输入流,v 参数设置为 0 表示不包含视频流,a 参数设置为 1 表示仅包含音频流。最后,-map 参数用于选择输出流,本例中选择 [out] 作为输出流。
音频转码:mp3转aac 1 ffmpeg -i xxx.mp3 -acodec aac -strict experimental -ab 128k -ar 16k -ac 2 -y xxx.aac
可以用类似这样的命令,生成转换命令:
1 find . -type f|awk -F '/' '{print $2}'|awk -F '.' '{print "ffmpeg -i \""$1".mp3\" -acodec aac -strict experimental -y aac/\""$1".aac\""}'
注意,最终执行的时候,得把生成的命令放入一个transform.sh中,执行这个transform.sh脚本。
去掉视频的音频 剪切 裁剪视频 1 ffmpeg -ss 00:00:00 -i 数据可视化基础.mp4 -vcodec copy -acodec copy -t 00:12:07 数据可视化基础-上.mp4
裁剪音频 1 ffmpeg -i source.mp3 -vn -acodec copy -ss 00:03:21.36 -t 00:00:41 output.mp3
压缩 参考这个文章:
http://www.soolco.com/post/22962_1_1.html
http://blog.webhack.cn/biancheng/69.html
1 ffmpeg -i D:\src.mov -c:v libx264 -preset veryslow -crf 18 -c:acopy D:\dest1.mp4
意思是:将D盘的源文件src.mov,以“非常慢”的速度重新编码成H.264格式,保存为D:\dest1.mp4。其中,-preset指定的编码速度越慢,获得的压缩效率就越高。而-c:acopy又是什么意思呢?因为音频的码率一般都比较小,我们就不折腾它了,况且解码后重新编码也会损害音质,于是,就将音频数据从源文件中以原有编码格式直接拷入目标文件吧。
注意:上面的-c:acopy加上后会导致末尾的输出路径无法被识别到,因此我将其去掉了,我使用的命令类似这样:
1 ffmpeg -i "前端中台体系-2020.06.29-剪辑后的版本.mp4" -c:v libx264 -preset veryslow -crf 18 "./前端中台体系-2020.06.29-精简版.mp4"
视频从524M压缩到了78M,清晰度尚可。
无损压缩 1 ffmpeg -i Node-laptop.mp4 -vcodec libx264 -preset veryslow -crf 0 compress.mp4
压缩后的大小减少了10%左右,效果并不是很明显。
我们都知道画质越好,要求的码率越高,文件体积也越大,所谓的码率控制,就是在决定为每一个帧画面分配多少比特数,这是在权衡文件体积和画面质量,实际上ffmpeg一共支持三种码率控制模式:-qp,-crf,-b
-qp(constant quantizer):恒定量化器模式,利用特殊算法,将量化器转化为数字,这样一来,每一帧的画面质量都能够通过这些参数来判定,这些量化参数是可以手动测试的,不推荐,让软件自动设置就好了,画质被划分为0-51个级别,0就是无损的画质,用qp压缩视频,每一帧的画面都能达到该级别的质量,画质是最好的,体积也是最大的,大到无法想象,一般不采用这种码率控制模式
-crf (constant rate factor) 恒定速率因子模式 实际上就是一个浮动的qp模式,根据人眼调节码率,
-b (bitrate) 固定目标码率模式,编码器视图,让编码器最后的码率与我们给定的码率相等,视频码率和文件体积都是确定的
他们都是单遍编码
字幕 需求描述:
1、指定字体: fontfile=msyh.ttf
2、指定大小: fontsize=50
颜色: fontcolor=red
3、指定位置: x=0:y=0
4、指定时间
前5秒:enable=’lte(t,5)’
后5秒:enable=’gte(t,5)’
10-20秒:enable=’between(t,10,20)’
5、多个字幕
用逗号分隔:
1 ffmpeg -i original.mp4 -vf drawtext=fontcolor=red:fontsize=40:fontfile=msyh.ttf:line_spacing=7:text='hello':x=50:y=50:enable='lte(mod(t\,2)\,1)',drawtext=fontcolor=red:fontsize=40:fontfile=msyh.ttf:line_spacing=7:text='world':x=50:y=50:enable='gte(mod(t\,2)\,1)' -y out.mp4
1 ffmpeg -i 1.mp4 -vf drawtext=fontcolor=white:fontsize=100:text='Hello World':x=0:y=100:enable='lte(t\,2)',drawtext=fontcolor=green:fontsize=100:text='周昌炬':x=0:y=100:enable='gte(t\,2)' -y out.mp4
设置文本:text=’abc’
特效字幕 https://www.jianshu.com/p/f33910818a1c
制作软件arctime:https://arctime.org/
普通文本 https://blog.csdn.net/m0_37477175/article/details/106453427
1 ffmpeg -i original.mp4 -vf drawtext=fontcolor=black:fontsize=50:text='Hello World':x=0:y=100 -y out.mp4
输入文件 original.mp4
fontcolor 文字颜色 为黑色black
fontsize 文字大小 为50
text 文本内容 “Hello Word”
文本所处的位置 x=0,y=50
输出文件 out.mp4
-vf filtergraph (output):创建一个filtergraph的滤镜链并作用在流上。它实为-filter:v的别名,详细参考-filter选项。
抠除背景 1 ffmpeg -i screenshot.mp4 -i movie_with_alpha.mov -filter_complex "[1]split[m][a]; [a]geq='if(gt(lum(X,Y),16),255,0)',hue=s=0[al]; [m][al]alphamerge[ovr]; [ovr]scale=200:200[ovr1];[0][ovr1]overlay=100:200" -y output4.mp4
还可以通过colorkey这个filter来抠图:
https://blog.csdn.net/happydeer/article/details/88763274
如何解决黑边的问题? 1、分辨率加倍
(待验证)mov透明通道 https://www.zhihu.com/question/64162978
从视频中提取图像 1 ffmpeg -i input.mp4 -r 1 -f image2 image-%2d.png
-r – 设置帧速度。即,每秒提取帧到图像的数字。默认值是 25。-f – 表示输出格式,即,在我们的实例中是图像。image-%2d.png – 表明我们如何想命名提取的图像。在这个实例中,命名应该像这样image-01.png、image-02.png、image-03.png 等等开始。如果你使用 %3d,那么图像的命名像 image-001.png、image-002.png 等等开始。
将视频转为gif 1 ffmpeg -ss 00 :00 :20 -i sample.mp4 -to 10 -r 10 -vf scale=200 :-1 cutekid_cry.gif
-ss : indicates the starting point of GIF-i : input filesample.mp4 : My video file name-to : End position of the GIF file-r : frame rate. You can increase the value to get more quality GIF file-vf : filter graph. To scale the GIF image in the desired size. scale后面就是跟宽:高,如果某一个值是-1代表保持原来的比例自动生成,比如 1080:-1就是宽为1080,高则自动计算,避免变形。
(TODO)性能 threads 1 2 3 4 $ ffmpeg -threads 1 -i clip.mp4 -threads 1 -acodec libfdk_aac -vcodec libx264 -b:v 200k -vf scale=200:-2 -y clip-200.mp4 $ cat /proc/$(pgrep ffmpeg)/status | grep Threads
threads参数的原理 :
FFmpeg always has one main thread which does most of the processing. In case of multiple inputs there are also input threads for demuxing (1 thread per input); for single input demuxing is done on main thread.
Setting “threads N” (where N > 1) on input enables multithreaded decoding which can spawn N additional threads for each decoder which supports it. In your case video decoder supports it and audio decoder doesn’t so it is 3 threads - 1 main thread + 2 threads for video decoding.
Similarly, setting “threads N” on output enables multithreaded filtering and encoding which can spawn N additional threads for each filtergraph (I think in older ffmpeg versions this was “up to N threads per each filter”) and each encoder which supports it. There is also one important caveat - this only applies to encoders which do their thread management via ffmpeg; libx264 doesn’t do that - it forwards requested thread count to the x264 library which does its own thread management. x264 then might create up to 2*N threads (exact number depends on many encoding parameters). So for “threads 2” with single output you’ll get 1 main thread + 2 threads for the scaler + at least 2 threads for libx264. This still doesn’t add up to num_outputs * (1 + num_threads) behaviour you are seeing and I’d be interested to learn where additional threads come from but hopefully my answer explains why “threads 2” option doesn’t increase thread count by 2.
使用cuvid硬件加速 -hwaccel cuvid:指定使用cuvid硬件加速
网页切片技术 常见问题 音频 amix通过延时合并多个语音,音量越来越大 通过dropout_transition让音量不再越来越大:
1 ffmpeg -i D:\git\micro-video-server\config/../data/synthesis/temporary/0-0.mp3 -i D:\git\micro-video-server\config/../data/synthesis/temporary/0-1.mp3 -i D:\git\micro-video-server\config/../data/synthesis/temporary/1-0.mp3 -i D:\git\micro-video-server\config/../data/synthesis/temporary/1-1.mp3 -i D:\git\micro-video-server\config/../data/synthesis/temporary/1-2.mp3 -i D:\git\micro-video-server\config/../data/synthesis/temporary/1-3.mp3 -i D:\git\micro-video-server\config/../data/synthesis/temporary/1-4.mp3 -i D:\git\micro-video-server\config/../data/synthesis/temporary/1-5.mp3 -i D:\git\micro-video-server\config/../data/synthesis/temporary/1-6.mp3 -i D:\git\micro-video-server\config/../data/synthesis/temporary/2-0.mp3 -i D:\git\micro-video-server\config/../data/synthesis/temporary/2-1.mp3 -i D:\git\micro-video-server\config/../data/synthesis/temporary/2-2.mp3 -i D:\git\micro-video-server\config/../data/synthesis/temporary/3-0.mp3 -i D:\git\micro-video-server\config/../data/synthesis/temporary/3-1.mp3 -i D:\git\micro-video-server\config/../data/synthesis/temporary/3-2.mp3 -i D:\git\micro-video-server\config/../data/synthesis/temporary/4-0.mp3 -i D:\git\micro-video-server\config/../data/synthesis/temporary/4-1.mp3 -i D:\git\micro-video-server\config/../data/synthesis/temporary/4-2.mp3 -i D:\git\micro-video-server\config/../data/synthesis/temporary/5-0.mp3 -i D:\git\micro-video-server\config/../data/synthesis/temporary/5-1.mp3 -i D:\git\micro-video-server\config/../data/synthesis/temporary/5-2.mp3 -i D:\git\micro-video-server\config/../data/synthesis/temporary/6-0.mp3 -i D:\git\micro-video-server\config/../data/synthesis/temporary/6-1.mp3 -i D:\git\micro-video-server\config/../data/synthesis/temporary/6-2.mp3 -i D:\git\micro-video-server\config/../data/synthesis/temporary/7-0.mp3 -i D:\git\micro-video-server\config/../data/synthesis/temporary/7-1.mp3 -i D:\git\micro-video-server\config/../data/synthesis/temporary/7-2.mp3 -i D:\git\micro-video-server\config/../data/synthesis/temporary/8-0.mp3 -i D:\git\micro-video-server\config/../data/synthesis/temporary/8-1.mp3 -i D:\git\micro-video-server\config/../data/synthesis/temporary/8-2.mp3 -i D:\git\micro-video-server\config/../data/synthesis/temporary/9-0.mp3 -i D:\git\micro-video-server\config/../data/synthesis/temporary/9-1.mp3 -i D:\git\micro-video-server\config/../data/synthesis/temporary/9-2.mp3 -i D:\git\micro-video-server\config/../data/synthesis/temporary/10-0.mp3 -i D:\git\micro-video-server\config/../data/synthesis/temporary/10-1.mp3 -i D:\git\micro-video-server\config/../data/synthesis/temporary/10-2.mp3 -i D:\git\micro-video-server\config/../data/synthesis/temporary/11-0.mp3 -i D:\git\micro-video-server\config/../data/synthesis/temporary/11-1.mp3 -i D:\git\micro-video-server\config/../data/synthesis/temporary/11-2.mp3 -i D:\git\micro-video-server\config/../data/synthesis/temporary/12-0.mp3 -i D:\git\micro-video-server\config/../data/synthesis/temporary/12-1.mp3 -i D:\git\micro-video-server\config/../data/synthesis/temporary/12-2.mp3 -i D:\git\micro-video-server\config/../data/synthesis/temporary/13-0.mp3 -i D:\git\micro-video-server\config/../data/synthesis/temporary/13-1.mp3 -i D:\git\micro-video-server\config/../data/synthesis/temporary/13-2.mp3 -i D:\git\micro-video-server\config/../data/synthesis/temporary/14-0.mp3 -i D:\git\micro-video-server\config/../data/synthesis/temporary/14-1.mp3 -i D:\git\micro-video-server\config/../data/synthesis/temporary/14-2.mp3 -i D:\git\micro-video-server\config/../data/synthesis/temporary/15-0.mp3 -i D:\git\micro-video-server\config/../data/synthesis/temporary/15-1.mp3 -i D:\git\micro-video-server\config/../data/synthesis/temporary/15-2.mp3 -i D:\git\micro-video-server\config/../data/synthesis/temporary/16-0.mp3 -i D:\git\micro-video-server\config/../data/synthesis/temporary/16-1.mp3 -i D:\git\micro-video-server\config/../data/synthesis/temporary/16-2.mp3 -filter_complex "[0]adelay=2000|2000[a0];[1]adelay=3000|3000[a1];[2]adelay=6500|6500[a2];[3]adelay=7500|7500[a3];[4]adelay=10500|10500[a4];[5]adelay=11500|11500[a5];[6]adelay=13500|13500[a6];[7]adelay=14500|14500[a7];[8]adelay=16500|16500[a8];[9]adelay=20000|20000[a9];[10]adelay=22000|22000[a10];[11]adelay=25000|25000[a11];[12]adelay=29000|29000[a12];[13]adelay=32000|32000[a13];[14]adelay=35000|35000[a14];[15]adelay=39500|39500[a15];[16]adelay=43500|43500[a16];[17]adelay=46500|46500[a17];[18]adelay=51000|51000[a18];[19]adelay=53000|53000[a19];[20]adelay=56000|56000[a20];[21]adelay=60000|60000[a21];[22]adelay=63000|63000[a22];[23]adelay=66000|66000[a23];[24]adelay=70000|70000[a24];[25]adelay=74000|74000[a25];[26]adelay=77000|77000[a26];[27]adelay=81500|81500[a27];[28]adelay=83500|83500[a28];[29]adelay=86500|86500[a29];[30]adelay=89500|89500[a30];[31]adelay=92500|92500[a31];[32]adelay=95500|95500[a32];[33]adelay=98500|98500[a33];[34]adelay=101500|101500[a34];[35]adelay=103500|103500[a35];[36]adelay=106500|106500[a36];[37]adelay=108500|108500[a37];[38]adelay=111500|111500[a38];[39]adelay=114500|114500[a39];[40]adelay=117500|117500[a40];[41]adelay=120500|120500[a41];[42]adelay=124000|124000[a42];[43]adelay=127000|127000[a43];[44]adelay=130000|130000[a44];[45]adelay=133500|133500[a45];[46]adelay=135500|135500[a46];[47]adelay=138500|138500[a47];[48]adelay=141500|141500[a48];[49]adelay=145500|145500[a49];[50]adelay=148500|148500[a50];[51]adelay=152000|152000[a51];[52]adelay=155000|155000[a52];[53]adelay=158000|158000[a53];[a0][a1][a2][a3][a4][a5][a6][a7][a8][a9][a10][a11][a12][a13][a14][a15][a16][a17][a18][a19][a20][a21][a22][a23][a24][a25][a26][a27][a28][a29][a30][a31][a32][a33][a34][a35][a36][a37][a38][a39][a40][a41][a42][a43][a44][a45][a46][a47][a48][a49][a50][a51][a52][a53]amix=54:dropout_transition=165000" -f mp3 -y D:\git\micro-video-server\config/../data/synthesis/temporary/audio.mp3
放大音量:
1 ffmpeg -i D:\git\micro-video-server\config/../data/synthesis/temporary/audio.mp3 -af volume=50dB -y D:\git\micro-video-server\config/../data/synthesis/temporary/louder.mp3
放大50dB,声音已经失真了
放大20dB,声音又不够大,而且已经能听到背景杂音了。
然后找到了这个答案:
https://stackoverflow.com/questions/35509147/ffmpeg-amix-filter-volume-issue-with-inputs-of-different-duration
我试了下,通过dynaudnorm没效果,但是通过loudnorm是可以的:
1 ffmpeg -i D:\git\micro-video-server\config/../data/synthesis/temporary/0-0.mp3 -i D:\git\micro-video-server\config/../data/synthesis/temporary/0-1.mp3 -i D:\git\micro-video-server\config/../data/synthesis/temporary/1-0.mp3 -i D:\git\micro-video-server\config/../data/synthesis/temporary/1-1.mp3 -i D:\git\micro-video-server\config/../data/synthesis/temporary/1-2.mp3 -i D:\git\micro-video-server\config/../data/synthesis/temporary/1-3.mp3 -i D:\git\micro-video-server\config/../data/synthesis/temporary/1-4.mp3 -i D:\git\micro-video-server\config/../data/synthesis/temporary/1-5.mp3 -i D:\git\micro-video-server\config/../data/synthesis/temporary/1-6.mp3 -filter_complex "[0]adelay=2000|2000[a0];[1]adelay=3000|3000[a1];[2]adelay=6500|6500[a2];[3]adelay=7500|7500[a3];[4]adelay=10500|10500[a4];[5]adelay=11500|11500[a5];[6]adelay=13500|13500[a6];[7]adelay=14500|14500[a7];[8]adelay=16500|16500[a8];[a0][a1][a2][a3][a4][a5][a6][a7][a8]amix=9:dropout_transition=0,loudnorm" -f mp3 -y D:\git\micro-video-server\config/../data/synthesis/temporary/audio.mp3
报错:Automatic encoder selection failed for output stream 我在执行削弱音量的命令时,报错了:
1 2 3 ffmpeg -i a.mp3 -filter volume=0.1 b.mp3
原因是没有安装处理mp3所需的依赖库:libmp3lame
可以参考这个文章安装一下:https://www.jianshu.com/p/98532374f599
注意别忘了将/usr/local/lib/加入自动加载的库列表:
1 2 echo "/usr/local/lib/" >> /etc/ld.so.conf
视频 视频文件无法通过video标签进行播放 这是因为没有安装视频编码的依赖库 导致的,需要装一下x264这个依赖:
1 2 3 4 5 6 7 8 # 安装 x264(这是在网页上直接播放mp4所必须的encoder):
然后重新编译安装FFmpeg:
1 2 3 4 5 6 7 8 9 10 11 12 13 14 # Install FFmpeg
然后生成视频的时候,指定编码,就可以了:
1 ffmpeg -i a.mp4 -c:v h264 b.mp4
笔记-唐智勤 FFmpeg常用命令 一、命令部分
图片转视频
1 2 3 4 5 6 7 8 9 10 11 12 13 14 ffmpeg -r 20 -loop 1 -i demo.jpg -pix_fmt yuv420p -vcodec libx264 -b:v 600k -preset medium -crf 30 -vframes 20 -t 6.700 -y out.mp4
视频截取
假设源视频帧率为20, 假设我们需要截取00:00:10-00:00:30之间的视频
第一种
1 ffmpeg -ss 00:00:10 -i demo.mp4 -to 00:00:30.000 -c copy -y out.mp4
第二种
1 2 3 4 5 ffmpeg -i demo.mp4 -ss 00:00:10 -to 00:00:20.000 -c copy -y out.mp4
第三种(推荐)
1 2 3 4 5 6 7 8 9 10 ffmpeg -i demo.mp4 -vf "select=between(n\,200\,600)" -ss 00:00:10 -t 20 -c copy -y out.mp4
说明:第一种、第二种效果一直,FFmpeg直接根据输入参数截断视频输出,即输出20s视频
第三种,FFmpeg是先利用滤镜将10s前的视频静止为第10s的静态视频,30s后的视频静止为静态视频,得到一个跟源视频保持一样长度的视频,然后再执行截取,这样可以达到精准的视频帧级别的视频
截取关键帧
1 2 3 4 5 ffmpeg -ss 00:00:20.120 -i demo.mp4 -r 1 -f image2 -y test.jpg
视频合并
第一种(针对MPEG)
1 2 3 4 5 6 ffmpeg -i "concat:input1.mpg|input2.mpg|input3.mpg" -c copy output.mpg
第二种(推荐)
1 2 3 4 5 6 7 8 9 10 11 12 ffmpeg -f concat -safe 0 -i fileList.txt -c copy -y out.mp4
第三种(不建议-有损视频质量)
这种方式可以合并不同编码器的视频片段
1 2 3 4 5 6 7 8 ffmpeg -i input1.mp4 -i input2.webm -i input3.avi -filter_complex '[0:0] [0:1] [1:0] [1:1] [2:0] [2:1] concat=n=3:v=1:a=1 [v] [a]' -map '[v]' -map '[a]' -y out.mp4
重设视频大小
1 2 3 4 ffmpeg -i demo.mp4 -vf scale=1920:1080 -r 20 -y out.mp4
音视频合成
1 2 3 4 5 6 7 8 fmpeg -i a.mp3 -i b.mp3 -i demo.mp4 -filter_complex "[0]adelay=1000|1000[a];[1]adelay=1500|1500[b];[a][b]amix=2:dropout_transition=0,loudnorm[audiomixout]" -map 2:v -map [audiomixout] -c:v copy -y out.mp4
map详细解析(注意索引的下标都是从0开始的)
1 2 3 4 5 6 7 8 9 10 11 12 13 14 15 16 -map [-]input_file_id[:stream_specifier][,sync_file_id[:stream_specifier]] | [linklabel] (output)
分隔符简介(主要是对滤镜处理这块)
1 2 3 4 5 6 7 8 9 10 11 12 13 例如:
图片合成视频
1 2 3 4 ffmpeg -[r|vframes|framerate] 20 -i image-%04d.png -pix_fmt yuv420p -y out.mp4
视频增加字幕
1 2 3 4 5 6 7 8 9 10 11 12 13 14 15 16 ffmpeg -i demo.mp4 -lavfi "subtile='words.srt':force_style='Alignmnet=2,MarginV=70,fontsize=9,BorderStyle=1,Outline=0,Shadow=0'" -crf 1 -c:a copy -y out.mp4
添加水印[logo]
1 2 3 4 5 6 7 8 默认左上角:
二、其他部分
常用参数解析
1 2 3 4 5 6 7 8 9 10 11 -[r|vframes|framerate] 都是等价的,都是设置帧率的
码率问题说明
码率控制对于在线视频比较重要。因为在线视频需要考虑其能提供的带宽。
码率计算:
1 2 3 4 5 6 7 公式:
FFmpeg设置码率三种方式
1 2 3 4 5 6 7 8 9 -minrate 控制码率波动的最小值
通过压缩码率减少视频大小
1 2 3 4 5 比如一个视频源的码率比较高大概有20Mbps,文件非常大,需要压缩同时又不破坏分辨率情况
视频质量问题
1
2
3
ffmpeg -i input .mp4 -profile:v baseline -level 3.0 output.mp4 i input .mp4 -profile:v main -level 4.2 output.mp4 i input .mp4 -profile:v high -level 5.1 output.mp4
如果ffmpeg编译时加了external的libx264,那就这么写:
1 ffmpeg -i input .mp4 -c:v libx264 -x264-params "profile=high:level=3.0" output.mp4
从压缩比例来说,baseline< main < high,对于带宽比较局限的在线视频,可能会选择high,但有些时候,做个小视频,希望所有的设备基本都能解码(有些低端设备或早期的设备只能解码 baseline),那就牺牲文件大小吧,用baseline。
苹果的设备对不同profile的支持。
H264编码profile & level控制 背景知识 先科普一下profile&level。(这里讨论最常用的H264)
下图清楚的给出不同的profile&level的性能区别。profile
level
1 ffmpeg如何控制profile&level 举3个例子吧
1
2
3
ffmpeg -i input .mp4 -profile:v baseline -level 3.0 output.mp4 i input .mp4 -profile:v main -level 4.2 output.mp4 i input .mp4 -profile:v high -level 5.1 output.mp4
如果ffmpeg编译时加了external的libx264,那就这么写:
1 ffmpeg -i input .mp4 -c:v libx264 -x264-params "profile=high:level=3.0" output.mp4
从压缩比例来说,baseline< main < high,对于带宽比较局限的在线视频,可能会选择high,但有些时候,做个小视频,希望所有的设备基本都能解码(有些低端设备或早期的设备只能解码 baseline),那就牺牲文件大小吧,用baseline。自己取舍吧!
苹果的设备对不同profile的支持。
2. 编码效率和视频质量的取舍(preset, crf) 除了上面提到的,强行配置biterate,或者强行配置profile/level,还有2个参数可以控制编码效率。
ultrafast, superfast, veryfast, faster, fast, medium, slow, slower, veryslow and placebo.
CRF(Constant Rate Factor): 范围 0-51: 0是编码毫无丢失信息, 23 is 默认, 51 是最差的情况。相对合理的区间是18-28.
举个例子吧。
1 ffmpeg -i input -c:v libx264 -profile:v main -preset:v fast -level 3 .1 -x264opts crf=18
(参考自:https://trac.ffmpeg.org/wiki/Encode/H.264 )
3. H265 (HEVC)编码tile&level控制 背景知识 和H264的profile&level一样,为了应对不同应用的需求,HEVC制定了“层级”(tier) 和“等级”(level)。
不多说,直接给出怎么用。(supposed你用libx265编码)
1 ffmpeg -i input .mp4 -c:v libx265 -x265-params "profile=high:level=3.0" output.mp4
资料 FFmpeg中文文档:
https://www.bookstack.cn/read/other-doc-cn-ffmpeg/README.md
阮一峰的教程:
https://www.ruanyifeng.com/blog/2020/01/ffmpeg.html
别人的学习笔记:
https://blog.csdn.net/leixiaohua1020/article/details/15811977
ffmpeg的Node模块:
https://ffmpegwasm.github.io/
(精)比特率,帧率,分辨率对视频画质的影响:
https://blog.csdn.net/matrix_laboratory/article/details/56291742
(精)视频质量、分辨率及码率之间的关系(我们可以据此自动计算出最合适的码率):
https://blog.csdn.net/leixiaohua1020/article/details/12856087
(精)常用的20多个命令:
https://zhuanlan.zhihu.com/p/67878761
阿里云Serverless视频处理服务:
https://github.com/awesome-fc/fc-fnf-video-processing/tree/master/video-processing?spm=a2c6h.12873639.0.0.2e1d4986S92I83
通过FFmpeg和ImageMagick生成gif图:
https://ostechnix.com/create-animated-gif-ubuntu-16-04/
牛人:
https://blog.csdn.net/leixiaohua1020
https://www.zhihu.com/people/leixiaohua1020
100行代码实现最简单的基于FFMPEG+SDL的视频播放器(SDL1.x):
https://blog.csdn.net/leixiaohua1020/article/details/8652605